members work from October workshop
Good morning everyone.
This morning I have photos from 3 of the club members who attended the 14 October workshop showing what they have done with their master board project.
In case you are not sure what a master board is - it is this. You turn a plain piece of paper or card into a background paper by inking, painting, stamping all over it, whatever your creative hobby is. Use pen ends, plastic cards to create lines & circles & many more objects & shapes. From the master board you cut shapes to decorate cards or art journals pages etc. As well as sitting down to specifically create a page, another way is add to a sheet as you create other items. For example - too much ink or paint left on your craft sheet - use it on your master board. Still got ink on your stamp & you don't need to stamp it on the project you are making - do a second generation stamping on your master board. Eventually you will have a great piece of card to work with.
First it is Annette from Mold II club;

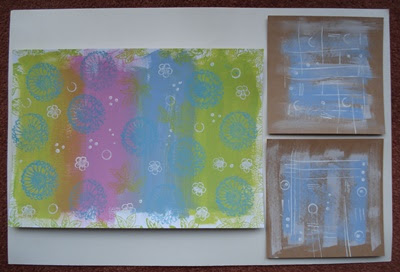
This photo shows Annette's master board & the two background panels she made. You can see from the photo how Annette has created little patterns with the end of a paintbrush (the trio of dots) & circles possibly from bottle lids. I look forward to seeing some finished cards Annette, using that master board.
Next we have Rhiannon from Mold club;

This is Rhiannon's background piece & you can see that she has used jar lids dipped in pain to make large circles. The straight lines possibly by dipping a strip of card in paint or gesso seeing as it is white.

Here Rhiannon has decorated with stamped & colored images using the stamps in her goodie bag from the workshop. As I don't have a photo of Rhiannon's master board I don't know if the cut out leaves & flowers were just coloured & stamped or cut from the master board. It looks good either way.
Next it is Lynn of Mold club;

This photo shows Lynn's background piece - again - using jar lid rims to create circles. Folded card strip to create zigzag lines.

Then here is the background piece with some stamping added & mounted onto black card. Layered onto the background are 3 images of one of the flower stamps, stamped at different angles cut out & layered onto black card. Really nice card.
I hope that more of you workshop ladies will send in photos of what you did with your pieces - or - bring them into the next club night & I will photograph them. Or someone will.
That is me for this Saturday morning - more tomorrow.
'Bye for now.


Hello Gloria, I stamped the goodie stamp on my painted board, then cut out the flowers and leaves to put on the card. Rhiannon
ReplyDeleteThank you for explaining it Rhiannon.
Deletehttp://elizabethr-thecraftyrobin.blogspot.co.uk/
ReplyDeleteElizabeth has done a blog post explaining how to do the masterboards and showing all her fab samples we saw at the workshop :)