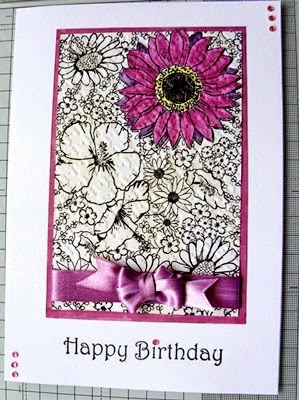
A birthday card
Good evening everyone - just before I show you this birthday card - a little chat about last night's Mold meeting.
We had Carolyn from Mold II show the ladies how to make that lovely Diorama card. Now true to how I manage things these days - I forgot to take my camera, but I was saved because I had my phone. So tomorrow I will be putting those photos on my laptop to show to you.
Before that I must once again thank Carolyn for coming along & showing this card - it was really well received & the ladies were very pleased with their cards.
Earlier today I spent a few hours with Caroline - browsing garden centres & having a coffee & a chat. Yesterday was Carolines birthday & it is her card that I am showing you today;
The colour has not quite come out right - it was more of a deep violet red than this. The background is one of Carolines own texture mats which I have had for a long time & recently when looking through a box of things saw it & thought - "about time I used that". This really is the first time I have used it.
I stamped it on white card with black ink & embossed with clear EP I then stamped again the area where the big flower is (yes that is part of the texture mat) - which I coloured with my pens. I cut a piece of white satin ribbon & coloured that with the same pens. Next I laid the large flower over its image on the background & held it down with a small strip of repositionable double sided tape. I used one of those tape pens.
The next stage was to run it through en embossing folder - the one I used had a sort of dog-tooth pattern. This is called "Embossed embossing" - because the process of embossing like this actually embosses the cut flower into the background. I layered the background onto another piece of white card leaving a small border which I had inked with the same pen that I used to colour the flower & ribbon. This was then layered onto the white card; a Happy Birthday sentiment stamped & some gems for bling. To make the little bow I used the tattered lace bow maker - mini size.
Well! another weekend - & a bank holiday one at that - it upon us once again. Have a lovely weekend whatever you choose to do.
Our weekend kicked off with us meeting up this evening with Gareth & Elayne & having a lovely evening meal at the Village Massala in Rhuddlan. Trouble is - it is another meal tomorrow when we meet up with one of Bob's friends of any years - still never mind the waist - think of the great company.
'Bye for now


It's a lovely card Gloria, I have done that embossed embossing a long time ago - yet another thing I've 'forgotten'. I even like your bow (I do not *do* bows!), it's very professional-looking.
ReplyDeleteThank you Joanna - yes its something I have brought back from a long time ago. The bow? Made on one of those Tattered Lace comb things - sorry Bowmaker :)
Delete