Having a play
Good afternoon everyone.
Oh dear more of that white stuff. It looks cold out there today - so make sure you wrap up warm & stay safe.
Yesterday & today I have had a play. I decided it was time to make sure I could remember how to make some of the cards we have made recently. It was triggered by wondering what sort of card to make for a friends birthday. I decided on the "pop & twist" card.
The first task was to have a rummage through patterned papers & stamps that would work together, Then the card for the actual base card.
I have noticed recently that I do have a problem with cutting straight & even, even when using a paper trimmer. I don't know if it is the make of trimmer I have (& I have 2 different ones), but when placing the edge of the card at the top of the trimmer doesn't always mean it is straight. Which means the downwards cut will be at a slight slant. So I tend to go back to measuring first & placng a pencil mark which I then align with the cutting blade. The next obstacle is then placing a layer straight onto the layer beneath. Gosh! I am coming to the conclusion it is me & my eyesight. I recently had my eyes tested & there is a slight difference to my left eye - so perhaps I am not seeing straight. Lets hope the new glasses cure that.
Well! Sorry I didn't really mean to be going on like that. Let's get down to the card.
Here are the pictures;
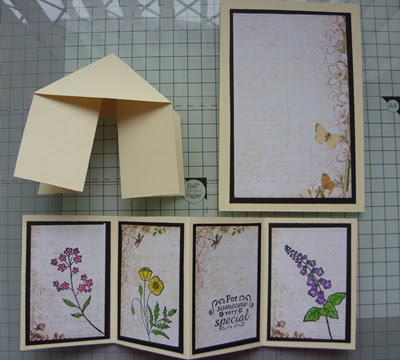
All the components laid out ready for putting together
I used a creamy, slightly yellow card, & designer paper that wasn't over the top, plus black card for the layering.
The flower stamps were from a nice set that was free with a recent magazine, which I think were just right for this card
Here is the front of the base card, layered & stamped.
The inside of the base card. I had decided to cover both the front & the back inside.
The card I used was just a little thinner than I would have liked so the layering made it a little sturdier.
The inside of the card, all put together.
I am pleased with this card mainly because I remembered how to make it. I did have to use the notes, that I had previously written as well, to get the size of all the pieces right.
I hope that despite the weather you are having a great weekend.
Take care
'Bye for now.
Before I forget - I will be updating the club pages & project photo pages a little later this afternoon.


It's lovely Gloria, I'm sure your friend will be delighted.
ReplyDelete