Posts

Showing posts from November, 2014

member showcase

Image
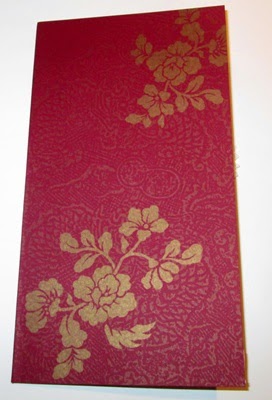
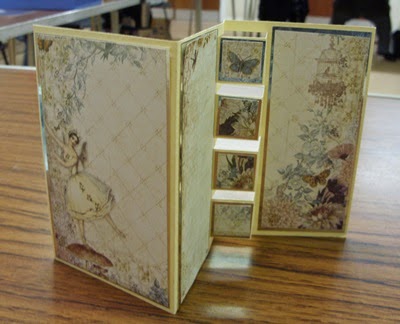
Hi again At the Mold meeting a week ago two of the ladies were discussing the popularity of the card-in-a-box that everybody was making.  It was Sheelagh & Joanna that were talking about it.  I mentioned to them that as I normally do whilst I was on holiday in Italy I searched out an Italian craft magazine & lo & behold they had this card in the magazine - but - with a difference. I briefly explained how they had used it & lo & behold a couple of days later these photos appear in my email inbox; An interesting front cover! first glimpse of the inside better view of the inside. Isn't it great?  It is the work of Joanna.  Simply - you make a card-in-a-box then glue 2 sides of it to the inside of the base card - placing one corner in the centre fold. Thank you Joanna.  I really must try & make one myself now. More member showcase tomorrow.

catching up

Just popping in to catch up ............ sorry I haven't blogged for a couple of days, but this cough eventually knocked me off my feet.  I also lost my voice - not that that stops you typing, but it also sapped any energy I had. I am being cossetted & not doing a lot so that I will be well enough to go to the CSNW meeting Wednesday - their last meeting of 2015. I have some members news to show you - & will follow this post with one of them.  Then the others I will probably put up tomorrow. I hope you are all well & not suffering coughs & colds. 'Bye for now.

Mold II photos - part 2

Image
Good morning everyone Today I have the photos from the Mold II project where we made the inner blocks card.  Those of you who have already made this may notice these look a little different.  This was due to an error on my part & wasn't noticed until all the cutting was done & the decoration was being started.  I read my own instructions wrong & gave them a measurement of 1" related to the blocks & it should have been 1.5", so their blocks are smaller than they should be. I did apologise & asked to be excused on the bases I was not well.  Aah!  But really there was no excuse I shouldn't make those sort of mistakes.  But being the lovely ladies they are they just carried on & made the best of it. This lovely cream vintage card was made by Elizabeth Oh, those Christmas puds are just right for those blocks / steps , aren't they! Lovely card by Carol. This lovely jade colour seems to be popular at the moment - the

Mold II photos - part 1

Image
Good evening everyone Here I am with the first set of photos from last nights meeting of Mold II club, & they are of their Show & Tell where the theme was a card from a sketch; This is the sketch here are their cards; This lovely green & white design using a poinsettia die was made by Elma This one looks a sort of pale blue - I would have said in "real life" it was more of a soft jade & was made by Betty A very rich design using a medallion peel off & was made by Liz This is such a delicate design - in a jade green shade.  The flower is a very soft fabric & according to Sue who made it - came off of another card. This pink/lilac design was made by Carolyn & I love that multi loop bow - so pretty. A lilac & white design using the poinsettia flower - but not as a poinsettia, for a birthday card & made by Carol. A very Christmas-y design made by Elizabeth.  Love the flowers.

just chatting

Good morning everyone I am afraid I was a little weary last night when I got home from the Mold II meeting & so didn't sit here to blog. We had a very pleasant evening & I must apologise to the ladies for my coughing which did get a little bad during the evening, & I promise I will get a Doctors appointment for some anti-biotics or something. This afternoon I will sort the photos from their Show & Tell, & also their project to show you, & sit here quietly & write about them. Have a good day - back later.

just chatting

Hi everyone - just popping in very briefly tonight - as I have developed a rather nasty cough & do not feel 100% - so trying to just rest up & clear it out of my system. Tomorrow night is the final 2014 meeting for Mold II - I will be there ladies - wouldn't miss the final evening of the year! So I am off to bed shortly in order to try & get a good nights sleep - which I didn't have last night. Obviously I will have some photos from the meeting to show you over the next few days & I also have a couple of sets of member news for you.  Will post one in the morning when I am sure I will be feeling a little brighter. 'Bye for now.

member showcase

Image
This member showcase is a little different. You will remember seeing the photos of these techniques found here & here  - which Mold club made at their October meeting with Janet.  Just click on the 2 highlighted words to go back & remind yourself. On Thursday night at the Mold meeting a couple of ladies brought their finished cards back for me & the other ladies, to see.  Here they are; They are absolutely beautiful.  I thought the photos showing just the flowers looked great, but now they have been layered up they make fantastic cards. Thank you to those of you who brought them in - I think it was only Joanna & Sheelagh, but if someone else has a card amongst them then I apologise for not naming you. That is me for now - may be back again, if not, then more tomorrow.

mold photos - part 2

Image
Good morning ladies - oh & I had better say gentlemen too, as I know a couple of them pop in & take a look at what we are doing & what I am writing about. Today I have the second set of photos from the Mold meeting on Thursday evening where Joanna showed us how to make a Christmas bauble from old greetings cards.  These of course can be made from stamped cards.  By which I mean stamp some card to make them - not cut up stamped cards you have received.  That would be such a shame. Joanna very kindly cut out the circles for us that were needed - 20 each person.  Fortunately she has a die to do that for her 4 at a time.  The circles are folded in such a way that a small triangle appears in the centre with 3 flaps surrounding it.  These flaps are used to glue it all together.  Here are the photos & once again there are a couple of blurry ones - not my fault this time - some of them wouldn't sop spinning; Made by Clare Made by Yvonne Made by Joan

Mold photos - part 1

Image
Hello again I am back with the photos of the Show & Tell from last night's Mold meeting - the last of 2014, where the theme was a Christmas bookmark. I must apologise at the start as a couple of photos from the evening are a little blurry - not sure why, other than I may have hurried taking them. New Years resolution - take better photos. A beautiful traditional bookmark shape bookmark with a little tag from Joan (Brown). That tree fits the shape really well. A corner book mark made by Rachel.  These were very popular at one time but you don't see them about so much now. This lovely (sorry it's blurry) bookmark is set on a peg & was made by Lynn. Great idea. The whole gift here - bookmark on a card - no, that should be in a card as it is tucked behind the topper.  This one was made by Joanna. What a cutie - another peg backed bookmark, displayed on a piece of card.   This peg creation by Rhiannon. Looking at the photo I a

just chatting

Hi everyone - sorry I didn't write anything last night after the Mold meeting - but I felt really tired. Perhaps because I had to do some work for a change?? We had a very good project & I will blog photos tomorrow - later today I will blog the Show & Tell photos. Another weekend is once again upon us - & only 33 days to go to Christmas. Well! instead of sitting here chatting I better get back to my card making.  Talk to you later. 'Bye for now.

Christmas cards

Image
Good evening everyone The title may say cards - but there is only one photo.  I made several in this style & I am very pleased to say it has rubber stamping on it; I started by embossing the front of the card with a holly embossing folder, then I stamped & embossed the  Christmas bauble & toed the bow.  It needed something else - so I spent some time looking through a box of background papers, & found this vellum gold embossed paper.  Just the ticket!  So cards are progressing quite well now, thank goodness. Tomorrow is the final meeting for this year for Mold club & it was only yesterday that I realised I hadn't got the programme typed up & printed for January to March, so today had to set to & get that sorted.  So - Mold are up to date.  I will also put the details on the blog over the next couple of weeks. That's me for today - more tomorrow, another Christmas card design perhaps. Night night.

just chatting

Hi everyone - sorry I didn't post anything yesterday - but I had a fairly busy day & then in the evening it was the final 2014 meeting of the Happy Stampers Club (HSNW) meetings. As we meet right at the top of the Wirral - it is a late night for me by the time I get home. So I am afraid I was a little too tired to write anything.  But that meeting is a reminder that we are fast running down to our last meetings for 2014 here in North Wales. Today I had a crochet workshop at Daleside & that was also the last 2014 get together for that group. I have 2 groups there & the other one meets next week.  Then that is the last of my workshops at Daleside for this year. Also today I have been tying up lose ends on some ideas for your clubs during 2015 & have, I think, "closed the deal" on one of my ideas.  Then as Thursday is the last 2014 meeting of the Mold club I have had to make sure that I have all the paperwork ready for that meeting & a sample card f

A great "me" day

Image
Good evening everyone Well, today I had a really great "me" day.  I went with Caroline to "Inkymits" run by Maria Simms to create another canvas.  The draw factor for me this time was that the basis was going to be black. I had seen on the Internet some canvases done with a black base but they had used Bitumen (that's tar isn't it?) - but not at this workshop. I have some progress photos for you; This is the first stage - a blank canvas - some dictionary paper (ooh - I know) & some embossed card. I can deal with the dictionary paper as it wasn't me that ripped it out the book. Next stage - layout all the bits in a nice design Then the following stage is stick it all down in place. The difference this time to previous canvases is the layered pieces rather than just one layer. So there are cogs placed on top of cogs. You will notice it is slightly different to the previous photo.  I was a bit quick thinking in taking