Posts

Showing posts from January, 2014

faux leather

Image
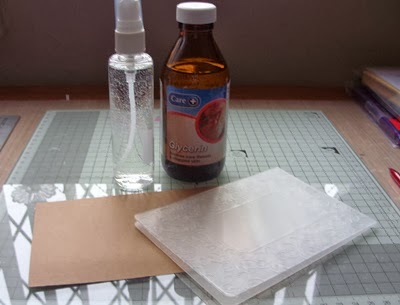
Hi everyone Ooh I did enjoy that play & can't wait to have another go.  The faux leather (for those who haven't seen it on C&C with Sheena Douglass) starts off as a piece of kraft card which is then treated with a water & glycerin mixture.  This is followed by being embossed in an embossing folder then treated with inks I didn't have any proper kraft card - but I do have a pile of kraft thin card folders - so I cut up one of those. Here is my play All set up ready to go The card after being sprayed several times, both sides, with the glycerin water mix, scrunched - then put through the E-bosser in an embossing folder. after being inked with Vintage Photo & Spiced Marmalade then inked with Fired Brick & Black Soot. The Black Soot was used mainly to highlight the embossed image After the final stage of being sprayed with Crafter's Companion - Spray & Shine. When I showed it to Bob - as I do all my

member showcase

Image
At the Mold II meeting on Tuesday Betty told me the story of Mother's Day cards she has been making.  It would appear she made a couple - they were seen - & more were ordered.  I asked her to send me photos to put here - & here they are; Well done Betty.  They are lovely. It is so good to see the cards you make - so come on ladies - send me photos.  Boast about your efforts.  That is what the blog is for. Back later.

Special birthday card

Image
Hi everyone - here is the photo of the birthday card I made last week for one of our club ladies - Liz in fact from Mold II. I couldn't show it before her birthday in case she popped in to have a look at the blog.  I don't think she bothers with the Internet but you never know & I didn't want to spoil the surprise. The stamps are from Lily of the Valley & are quite detailed - so I stamped them in black archival ink onto white card & managed to emboss them with clear EP.  I then used pink, blue & green shades of Distress Inks to lightly colour them.  A little 70 on the tag & a small Happy Birthday peel off to finish. The card is a 5x5 square card & I rounded the 2 outer corners & covered with the blue floral paper.  Next I cut a smaller square of the pink floral & placed a strip of matching paper down the back on the left & right side.  This allowed me to roll the corners without having white paper showing. This afternoon

mold II photos - project

Image
This will probably be my last visit today & I am back with the project photos from last nights Mold II meeting where the theme was Four square. As I said in the last post - I didn't lay down any restrictions & just waited for great ideas & as I also said - I was not disappointed; A lovely clean & crisp design, & exactly as someone from Mold did - tried to catch me out  - as at first I though - hmm, only 3 squares.  No there are definitely 4 & very clever design it is too. Another delicate design - makes you think of spring. Delicate again - spring must be in the air. A lovely clean & crisp design. Isn't that sentiment gorgeous. Seems like this evening is staying with the more pastel shades - or will that change shortly. Lovely layout & design - I like the little ribbon hangers on 2 of the squares I love the little buttons that give texture & interest to this lovely clean design Oops - I am real

Mold photos - January Project

Image
Hi - Yes it is me again, this time with the photos from the Mold project on 16 January.  You may remember I held them over until Mold II had also tried this project.  CSNW are not doing this project until March - but I didn't like to hold the photos over that long. So here they are - the project was - Four Square.  The idea to use four squares in the design.  I didn't put any restrictions on what could be done & how - so was looking forward to some great ideas & was not disappointed from either club; A lovely clean & crisp design adorned with one of the paper bows we made that night too. Sorry this is a little fuzzy but I think you can see the great design & layout.  Love the colour scheme. Well! definitely 4-square on this design (twice) a great layout & there is that colour scheme again. I love the shaping on these squares - very complimentary to the base card.  Great design. Those stamps are brilliant - they are from M

member news

Image
Last night at Mold II club Betty brought in the latest copy of Papercraft Inspirations (or it might have been Papercraft Essentials) - but in any case one of her cards had been showcased. Well done Betty - am I correct that you won a prize too? The other piece of member news is a photograph of Liz at last night's Mold II meeting showing her with her birthday flowers. It is a special birthday for Liz & it is actually today - so very Happy Birthday Liz.

Mold II photos - part 1

Image
Good afternoon everyone Well, as promised here I am with the start of quite a lot of photos to show you. First, in this post - the Show & Tell from last night's Mold II meeting, where the theme was a card using the Ghosting technique learnt at the November meeting. A lovely card - this technique is so clever - it looks like it has been dry embossed. This card didn't photograph too well - I should have taken a couple of closeup shots. It was unusual to have used an outline stamp - but it shows that the technique still works. See what I mean about the dry embossing - it is almost as if it has been through an embossing folder.  It's a lovely technique. So there were only these 3 cards for the Show & Tell but what great designs.  I will be back shortly with some members news.

just chatting

Hi everyone Well, we had a very pleasant meeting of Mold II club this evening - the first one of 2014.  Lots of chatting & catching up to do. I took photos of the Show & Tell & also the project which I will be able to start loading tomorrow. As the project was the same as the one that Mold club did for their January meeting I will show Mold photos first then those from Mold II. There is also a members news photo to show, & one of the Mold II ladies - Liz - is celebrating a big birthday tomorrow, so I have a photo of her with the flowers the club gave her. But first I have to get them all loaded on my computer which I will do in the morning. That's it for tonight.  Lots ore tomorrow.  'Bye for now.

Play day

Image
Hi everyone I had quite a good play day today.  It started with making a special birthday card - which I won't be able to show you for a day or two. Then - whilst having my lunch & watching Sheena Douglass on C&C I discovered something else to try.  I really only caught the tail end of the programme - but as she is the Four Day Deal this week I have gone ahead & set all the programmes to record.  Hopefully they will repeat today's programme & I can see the bit I missed. Anyway at the point I watched she was taking embossing folders a stage further.  After watching I just had to have a try & here is the result of my play; A piece of card is embossed in an embossing folder (the piece on the left), then the raised areas (as much or as little as suits) are coloured with pens.  I used Promarkers.  This looks good in its own right but the colours I used were quite bright - so if I hadn't been going on to do the next stage I would have used softer

A mixed media card

Image
Hi everyone. Earlier today I took some time out for a "me time" session & worked on another mixed media card - this time with some stamping.  I suppose it could be described as mixed media & collage.  Here is the card; It started off as a 12x12 patterned scrap book page which I cut into four 6x6 pieces.  I decorated one & have 3 pieces left for more cards. I have posted this card along with a very detailed description of how I made it on my Rubber Stamping blog which you can get to by clicking on the link at the right hand side of this page. I used various media & elements - mask with Distress Ink, sequin waste with filler paste, watercolour paints, sequin waste, paper topper, background stamps, paper flowers & flourish, flat backed gems. At the moment it doesn't have a sentiment on the front - I am looking for the right stamp. The finished page was layered onto black card then onto a white base card.  I really enjoyed doing this on

Success.................

Image
....... yes, I have found those stamps with the dies & all the other stamps & things I bought at the last Port Sunlight Stamp Festival. Having sorted a book-case & some boxes yesterday - today I tackled my crafting desk.  I didn't find what I was looking for - but oh do I have such very tidy desk drawers now.  It was a great opportunity of getting rid of unwanted things that had just been pushed into them.  Under that desk is a wire-mesh 4-drawer unit.  Two of the drawers hold cards & envelopes & the other two hold stamps.  So! out came the drawers & they were thoroughly sorted - no, my items were not in there either. In frustration I sat in my chair & looked around the craft room.  Was I going to have to open every box that were on the shelves in order to see if I had somehow put them into a box they shouldn't be in?  Well, it wouldn't be every shelf as some hold folders which hold other things.  As I stared at one of the bookshelves I still

A frustrating day, but .......

............... not mine. I didn't write anything last night because there wasn't really anything of interest to report & I had not got around to making any cards.  Although one side of my craft room has been searched for those elusive items. But I did get an email from Betty of the Mold II club (apologies Betty I did say I would blog it last night) - this is what she had to say; "Hi, Just thought I'd let you know about my "fab day"!!.  After cutting a very small Tattered Lace die on my Cuttlebug, I couldn't find thee die.  Later I found it had vanished into the Cuttlebug. Now my Cuttlebug is unusable.  My first crafting disaster.  Let this be a warning with tiny days. An unhappy crafter (temporarily). Betty." This morning I had another email from Betty which read - "Hi, I had a thought.  I should have used a magnetic sheet while cutting, then the die would be secure.  Bob is working on the Cuttlebug with a screwdriver, trying to

Another chatty post ..........

Image
....... but perhaps not quite so lengthy as yesterday. A pretty ordinary day today really - my first bit of excitement was a trip to the chiropodist, then some shopping - then I realised I needed to sort out my crochet workshops folders.  I have a crochet workshop tomorrow which includes 4 new ladies, so I had to make sure I had all the necessary notes for them. As well as notes & samples I also take along balls of wool for their first lesson - so I had to make sure I had enough balls of wool too.  Then I noticed I had lots of repeats amongst my samples due to the fact that I often work with them when doing something specific like making a flower motif or a granny square & so on.  So I had a little clear out of those too. Then I did some You-tube watching - some tutorials to help me work on some new workshops at the garden centre.  I was also gathering ideas for the workshop we will be doing with the clubs. So! that was my day.  But popping back to yesterday morning ...