Posts

Showing posts from January, 2018

Another recent card

Image
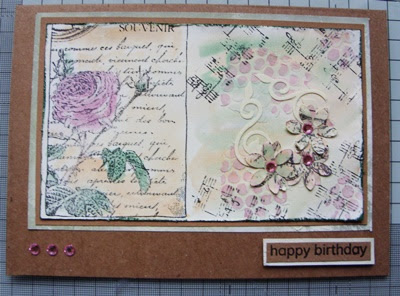
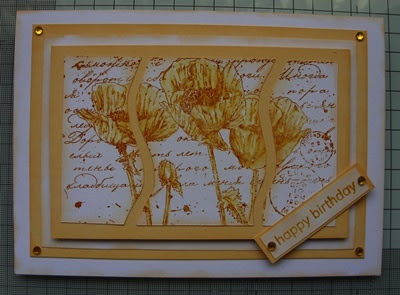
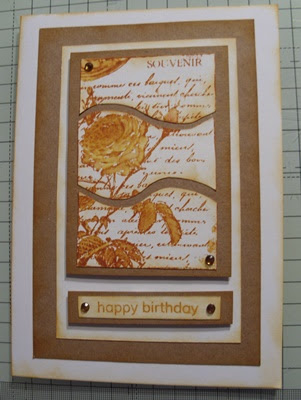
Good evening everyone. This evening I have another of my recently created cards to show you. I was in a vintage mood making this one & like one I showed you a few days ago the image is one stamp.  I disstressed the edges of the card, added some partial stamping & texture paste through a stencil. The rose I coloured with my pearlescent water colour paints & added some paper flowers that I had stamped similarly as the background.  I had a couple of those flourish corners left from the earlier card & so used them to embellish the flowers.  Some gems added to the centre of the flowers & along the left hand lower edge of the card to add some bling. I layered the focal image onto some Kraft card & then onto a piece of card I found in my stash that I had treated with gesso & distress inks.  It picked up the grey green shade in the focal image. Then placed the layers onto a basic 7 x 5 Kraft card. That's me for another day - 'bye for now.

a recent card

Image
Good afternoon everyone This afternoon I have another of my recently made cards to show you; This is another of the cards I made whilst in the mono-colour mood. Again I have used similar colours to that card, I used a white 5 x 7 base card, white card& a caramel (sort of colour) card & a caramel shade of Adirondack ink,  Because the ink is a dye based ink I was able to take my water brush & pull in some colour to the poppies. Like the other card I showed you HERE  I used 2 wavy cuts to divide the focal image into 3 pieces then placed them on the layer beneath leaving a small gap between each piece. I quite like the way these cuts look, it is a little different to just cutting them into 3 straight pieces like a traditional triptych. Another ard to show you tomorrow - 'bye for now.

some cards.......

Image
... I have made - not stamping --- sorry! Good afternoon everyone.  I thought they had promised sunshine for today! This morning I met up with Helen from Mold II club & Jeanette who used to be a Mold II member, for a coffee & a natter.  We went to the little farm shop & garden centre in Drury - Lesters.  Nice long chat was had about all sorts of things. When I got back home I decided I should sit & do some kind of crafting, so I popped into my craft room to see what I fancied doing.  The other day I had sorted out a box of bits & pieces that I had wanted to look at before Christmas but didn't have the time to get around to doing so.  In the box were 2 packs of "Postcards".  I can't think of a better description for them.  I think I bought them off of Rita of Mold II when she brought in her little "shop" items for us. It was time to do something with them - so, firstly I mounted each one on to black card leaving a fairly thin borde

Tutorial for decorating a wooden box ....

..... as many of us did at the October 2017 workshop with Elizabeth Robinson. There is now a new page tab at the top of the screen & its on the second line just to the left of "Leaving a comment". If anyone wants a printed copy of this tutorial please let me know. .................................. Updated a few moments later - by changing description of where to find it.

member showcase

Image
Good afternoon everyone A little while ago I had an email from Sheelagh of Mold club who wanted to know where she could get hold of some tissue boxes like the ones we need in the October workshop. She wanted to decorate some more as someone had shown an interest in the one she had made then. She also hoped that she would be able to remember the process in decorating them. It hadn't been a difficult process but sometimes when you are talked through something, later on it is not easy to think of the order of things. Anyway, I managed to find a source for her for the boxes & I think Sheelagh had also found some square boxes as well - but not wooden.  Then I got in touch with Elizabeth who took the workshop regarding the decorating steps.  She, being the star she is - typed me up some notes.  In case anyone else is thinking of decorating another tissue box - or any box in a similar manner I will put the instructions on the blog.  Will let you know when I have done it. In

Happy Birthday

Image
Birthday Greetings Today is January 26th & a Mold club member has a birthday Have a lovely day Joanna

Mold II photos

Image
Good afternoon everyone & it is so nice to see the sunshine again - although as I type this it is gradually fading.  Ah well. Today I have the photos of the Mold II project at their meeting on Tuesday evening.  They were making another different shaped card by courtesy of Carolyn. It is a suspension card - (or possibly a suspender card!) - here is a photo of the one that Carolyn sent to go on the Projects Photo page which shows the card from the side where the suspension can be seen. Carolyn sent me one of these cards as a Thinking of You card & although I have held one in my hands I am not sure how it went together. I must get it out & investigate, & Carolyn kindly gave me one of the templates when I saw her on Tuesday so I must have a go at making one.   Here is a lovely all cards group photo ........... ... & here are the individual cards. That flower on the circular topper really works well Christine. Lovely card. A real

A recent card

Image
Hello again. This time I have a card to show you that I made recently; I was feeling in a mono colour mood when I made this card & I wanted a clean & fresh finish. Sometime recently I saw a card made in a similar fashion to this one & rather liked the idea, so decided to use it in this card. The base card is white & has layers of white & Kraft card. For the ink I used a Adirondack ink pad in a caramel colour.  The image is one stamp & after stamping it I went over the roses & leaves with a water brush to pull the colour into them.  The Happy Birthday is a Clearly Besotted stamp - I like the font they used in this set. Having stamped the focal image I then drew 2 curved lines on the back & cut along them dividing the image into 3 sections  (which of course you can see from the photo - duh!).  They were then layered on to the Kraft card leaving a small gap between each piece. A couple of toning gems to add a little bling to complete.

boring information but .........

........... necessary. This post is just to remind everyone that this years subs will be due shortly.  There are various dates so I am going to list them here. For Mold II - they are due in February For CSNW - they are due in March For Mold - they are due in April I cannot guarantee that I will be at those meetings but will organise how they can be collected.  There is no change to the amount. Please be aware that the old £10 note finishes on 1st March - so be sure to divest yourself of them.  I have checked the club boxes that I hold here & have swapped the old £10 notes in them for new notes, & will definitely have spent them before March - 😉 So if you can avoid it please try not to pay your subs with these old notes.  Thank you. Proper post later today. 'Bye for now.

a card made today

Image
Good afternoon everyone - I hope you are all well. The card I have to show you this afternoon is one that I made during the day - so it is hot off the press.  Well! hot off the craft desk actually.😊 Our daughter who lives in the states has a birthday in early February - so I have to make it & send it in plenty of time to be received for her birthday.  The USA postal service is a little strange & things can take a long time. Here is the card; I went for the vintage look this time. The whole image is one stamp- but where the blank area is - on the right side - I added some partial stamping with background stamps & some texture paste through a stencil. I distressed the edges - both with ink & the side of a pair of scissors.  The piece was then mounted onto black card & then onto a cream card.  I had some corner die-cuts in cream card in my stash so I thought I would use 2 of those as well.  Then I added the "happy birthday" on a piece of bla

Happy Birthday

Image
Birthday Greetings Today is January 21st & a Mold club member has a birthday Have a lovely day Janet

Mold photos - part 2

Image
Good afternoon everyone on this rather wet grey day.  It did have a little attempt to snow earlier but seems to have changed its mind. I hope you have a good weekend planned. The photos today are of Mold clubs project on Thursday evening.  An idea that Joanna found & showed the ladies how to do. I don't think it has a name, but the background effect has a look of Pointillism in it - which we did some time back.  They are absolutely lovely cards so I am sure the ladies loved trying this technique. This is Clare's card - the design is so clean & crisp  & the embossed lines really set the toppers off well. I like the way that Janet has staggered the images on her card. & of course the added bling. A different approach by Joan as she added colour to the focal image in each topper. Here is Joanna's version using different images in each topper - very effective. Here is Lynn's card - I like that the images are in dif

Projects photo page

Hi Just popping in to let you know I have updated the following projects photo page & club page for CSNW club for their February meeting & also Mold club for their February meetings. The project that Joanna has chosen for the Mold February meeting is one I have had in my ideas folder since about last September. Craft minds think alike - it seems, The little note book that Grace is going to show the CSNW club ladies is one she made for me a while back.  It is so useful I have it on my desk to jot ideas down as they come to me or those I spot on TV or internet searches. Don't forget to check the pages to see what you need to take with you. 'Bye

Mold photos - part 1

Image
Good afternoon everyone.  Brr! I do not like this cold & by choice I don't think I will go out in it either.  Although I did brave it this morning so that I have could have my hair done - it needed a tidy up. Anyway.  Mold club photos.  This afternoon I have the first set of photos from their meeting last night & they are of their Show & Tell cards.  The theme was set by Joanna - thank you Joanna - & it was to make a card from a sketch using mainly yellow & grey. Here is the sketch................ ............... & here are the cards; This is Janet's card with the 2 background pieces in the 2 colours. Some lovely air balloons as the decoration over an embossed background. Here is Joan's card & this time her 2 background pieces are in 2 different shades of grey.  Love that little floral embossing folder. Pretty grey flowers on yellow circles for the decorations.  Ooh - with bling down the side too. Here is

Finding myself a project

Image
Good afternoon everyone. Over about the last week or so I have been trying to think of a project for myself  - either long lasting or just for 2018.  So in time honoured practise I went to T'internet to get some inspiration.  Usually I end up trawling through the many many pages on Pinterest.  Which I did again this time. After days of searching & getting lost in all the wonderful things out there that very clever people make, I found something entirely new to me which has whetted my appetite - but this will need quite a bit of thinking about.  Also something that I started doing back in 2010 that I had not tried for ages.  Tags! Yesterday I hunted out the book that I had started keeping tags in & took photos.  Some of them were from tag workshops I had run, there were a couple I had entered into blog challenges & the rest were ones that just seemed to get created.  I was very surprised by how my tastes had changed & look forward to seeing what I can do n

Just chatting

Good evening everyone. I am sorry I didn't write a post yesterday but most of it was spent travelling to & from the hospital along with my actual appointment.  By the time I got home I was rather tired - so my apologies. The visit was for the first of my monthly injections - so now I have to see how they will make me feel day to day. Today I have managed to sit & make some birthday cards - but I cannot show them to you just yet - possibly next week some time.  I quite enjoyed getting back to making things & hope to set aside some time each day now. Tomorrow evening is the first 2018 meeting of the Mold club & I am hoping to pop in & see everyone.  In fact I am going to try & pop in to each club for their "first" meetings of the year. From those visits I should be able to tell how well I can manage - but I don't think I will be back regularly just yet. I am pleased to see that the snow that fell yesterday evening didn't lay - althoug

A recent card

Image
Good afternoon everyone - oh dear what a miserable afternoon it is too.  Weather wise of course, & on the TV just now they have forecast snow for tomorrow.  Just what we need - I don't think. Ooh - our weather is so fickle - the sun is shining now. The card I have to show you today is probably my most recently made one as it was for Bob's birthday at the beginning of the month. As you can see he is celebrating one of those "big" birthdays. My base card was a large cream square card & the layers are black & cream.  The topper was a Tonic die set I have & it consists of a couple of different word frames.  The "70" came from a set of dies which were in fact one of my first sets of dies ever.  They consist of a complete alphabet set in thick & thin dies plus numerals - also thick & thin.  The numbers on the card are the thicker version.  Having the 2 thickness you can layer them together giving a different look. It is onl