Black & White
Hi everyone here I am again as promised.
Today I finished Gareth's birthday card - but you can't see it until tomorrow evening - after I have given it to him. Bob & I are taking him out for a meal at the local new Gastro Pub near us. Gosh that's two eating outs in three days - will have to watch my weight!!!!!! I wonder how long before people stop calling it the new Gastro Pub?
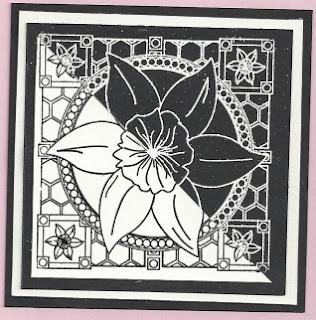

So, this is how they were made. Ir's a technique called "Split Negative". Very basically you stamp an image twice & cut them into 2 pieces, then you reassemble them again into 2 different pictures, each one containing one half of each image. I guess the picture is more self explanatory. As you can see I created matting & layering in 2 sizes in each colour - black & white. Looking at the top photo you can see that I started with a large black square & layered a smaller white square on to it. Then I stamped the image with Versamark ink onto another black square & heat embossed it with white EP. I then repeated the steps the other way round with white & black layers & stamped the image onto a white square with black Versafine ink & heat embossed it with clear EP. I then carefully sliced those 2 images in half diagonally. On the top photo a half white image has been placed in the lower left side on top of the full black image. On the lower photo the reverse has been done the half black image has been placed in the lower left side on top of the full white image. Make sense? There are actually a couple of different ways to do this. One is to stamp the image twice in the 2 different ways, then cut them in half, then place 2 halves together onto another plain layer.
Phew! I really hope that makes sense. We did actually do this technique at the Mold club quite a while ago. I am going to make it a project in 2011 - so if Mold ladies would like to do it again I may put it on their programme too.
More tomorrow. That's it for tonight. Sweet dreams.
Today I finished Gareth's birthday card - but you can't see it until tomorrow evening - after I have given it to him. Bob & I are taking him out for a meal at the local new Gastro Pub near us. Gosh that's two eating outs in three days - will have to watch my weight!!!!!! I wonder how long before people stop calling it the new Gastro Pub?
Also today I finally decided that I must finish my samples for the HSNW Festival Exhibition board. Those of you who go to Port Sunlight will know that we always have an exhibition of members work on display. I had come up with the idea a few weeks back, cut out the card then decided to give it a bit more thought, as you do. They are needed this week by a colleague in order to set up the boards. So! after a phone call from her to remind me to put them in the post to her I set to & finished them. A couple of places I got frustrated as things didn't go quite right. Then after stopping for a moment & re-gathering my thought off I went. Here are the photos - I made two samples rather than one - you will see why. After the photos I will explain what I did.


You know - one of these days ........... yes, I've said it before...... I will get the items straight in the scanner. I'm sure there is a gremlin in there that moves them when I close the lid.So, this is how they were made. Ir's a technique called "Split Negative". Very basically you stamp an image twice & cut them into 2 pieces, then you reassemble them again into 2 different pictures, each one containing one half of each image. I guess the picture is more self explanatory. As you can see I created matting & layering in 2 sizes in each colour - black & white. Looking at the top photo you can see that I started with a large black square & layered a smaller white square on to it. Then I stamped the image with Versamark ink onto another black square & heat embossed it with white EP. I then repeated the steps the other way round with white & black layers & stamped the image onto a white square with black Versafine ink & heat embossed it with clear EP. I then carefully sliced those 2 images in half diagonally. On the top photo a half white image has been placed in the lower left side on top of the full black image. On the lower photo the reverse has been done the half black image has been placed in the lower left side on top of the full white image. Make sense? There are actually a couple of different ways to do this. One is to stamp the image twice in the 2 different ways, then cut them in half, then place 2 halves together onto another plain layer.
Phew! I really hope that makes sense. We did actually do this technique at the Mold club quite a while ago. I am going to make it a project in 2011 - so if Mold ladies would like to do it again I may put it on their programme too.
More tomorrow. That's it for tonight. Sweet dreams.


Comments
Post a Comment
Please leave a comment - it is always nice to receive your thoughts.
PLEASE NOTE;
ALL comments are moderated & will not appear here until I have approved them - this is to avoid spam & junk comments. Apologies for having to build this in to the system